Ok, so I made the onesie, but I think I need to fine tune it a bit before I can make a decent tutorial. but I did find this super cute one that I used as inspiration! I'm trying to find a shirt I could use for this one!Hope you enjoy!
Make a Baby Romper From a T-Shirt
Tuesday, October 19, 2010
Monday, October 18, 2010
New Project!!
I know it's been a while, yet again.. But I have been inspired! I am going right now to attempt to turn a small, but very cute women's tee into a super cute onesie type thing for Kaiden. I'm hoping to make a good tutorial from it as well. Let's see how it goes. Wish me luck! And hopefully later today or sometime soon.. it'll be up on here! :)
Wednesday, October 6, 2010
It's been a while...
Ok, I realize it's been a while since I posted anything.. Not too sure it matters since I only have a few subscribers, but sorry anyway! :) I haven't been crafting quite as much lately because we've been busier and have been preoccupied trying to buy a house!! :D As if you didn't already know, since it's about all I talk about lately.. Anyway, there should be some fun stuff to post about if everything goes well and we move in next month! We're going to give Kaiya the pink fairy princess room she wants, and Kaiden the super cute monkey/jungle room I want him to have! :) Also, Woody said I can pain the cabinets in the kitchen all garden-ie, so that'll be fun too!! I'm getting so excited!! Making that house our home is going to be SO MUCH FUN!! Our inspection is Saturday, so I will have pictures up shortly after. Those will be the "before" pictures... anyway.. We're still hoping for the best. I will try to find something more interesting to put up here shortly. Gotta go now, we have to go sign papers for the house!! :D
Friday, September 17, 2010
New Cocoon Pattern is here!!
Ok, so I worked pretty hard yesterday trying to get the pattern converted, and finished it late last night. :) It's not exactly the same, but it is pretty close. One major difference is I didn't have the buttons to put on it, so mine is buttonless.. Though I was thinking if making a few crochet star buttons or something cute like that... That'll have to be another post later.
So, I used Bernat Baby's Breath yarn and I bought 2 skiens and ran out just a few rows from the end... Hence the fuzzy feet on mine. And these pictures were just taken with my phone using my daughter's "babies" as models.. Haha. I'll have to get better pictures later, I'm just so excited I got it done, I wanted to post it!
 |
| It doesn't have a hood, but depending on how you snuggle your lil' one up, it can go up around their head. :) |
So, here it is!
GAUGE:
5 st and 4 rows = 2 inches All in SC
I actually figured out the gauge conversion to put on here, but I don't think it's totally necessary as it didn't always seem to match up as I worked the pattern, but here it is anyway. :)
PATTERN:
CH 61 It should measure about 20", but if it's a little off, don't worry about it. it'll still be fine.
Row 1:SC in 2nd Ch from hook and each st across.
Row 2: Ch 2, Hdc in each stitch across.
Repeat row 2 21 more times, until your piece measures about 10" from top to bottom. This is going to be the flaps at the top. Then, fold in half and join to the Ch 2 of the beginning of the row you just worked to form a ring. PLace a marker where you joined and move it up at the end of each round finished. Do not join.
Row 24: HDC in each st around.
Rnd 25: Hdc 7, Sc2tog* repeat from * to end of round
Rnd 26: SC all stitches
Rnd 27: Hdc6, sc2tog* repeat from * to end of round
Rnd 28: sc all stitches
Rnd 29: Hdc5, sc2tog* repeat from * to end of round
Rnd 30: sc all stitches
Rnd 31: Hdc4, sc2tog* repeat from * to end of round
Rnd 32: sc all stitches
Rnd 33: Hdc3, sc2tog* repeat from * to end of round
Rnd 34: sc all stitches
Rnd 35: Hdc2, sc2tog* repeat from * to end of round
Rnd 36: sc all stitches
Rnd 37: Hdc1, sc2tog* repeat from * to end of round
Rnd 38: sc all stitches
Rnd 39 Hdc1, sc2tog* repeat from * to end of round
Finish off leaving a long tail to weave the small opening closed. Much like you would to make the top of a stocking hat. If there is still a small opening, you can leave it or simple stitch it closed. Now, it's as complete as the one I've made so far. Here's some more pictures.. Then about the buttons..
 |
| This is what it looks like laid out. You can even see my whoopsie on the edge of the flap.. Oh well.. |
 |
| One way to wrap a baby up, even without the buttons! |
 |
| Another wrapping idea. |
Now, the knitted directions said to sew the buttons on at about 3.5 and 7" from the top edge, but said nothing of button holes. I have an idea for this, but I haven't gotten to test it yet, so I'll have to add it on later. But here is a basic pattern. If you have any questions, feel free to comment, and I will do my best to answer them. Thanks for reading!!
Thursday, September 16, 2010
New Cocoon Pattern...
Hello All!!
I am currently trying to make a crochet pattern from a knitted one. I am in the process of rewriting the pattern and making the cocoon, just to make sure it works before I post it. If all goes well, it should turn out looking something like this one...


Wish me luck!! I'll let you know how it goes...
I am currently trying to make a crochet pattern from a knitted one. I am in the process of rewriting the pattern and making the cocoon, just to make sure it works before I post it. If all goes well, it should turn out looking something like this one...


They look SO cozy!! I hope it works! They tend to work up pretty quick. I can't wait to snuggle up my lil man in one of these!! :D
Wish me luck!! I'll let you know how it goes...
Wednesday, September 15, 2010
My Baby Cocoon Attempt :)
Well, I was asked by one person to post the directions on how I made my cocoon, so here's my first attempt at posting crochet instructions! Please bear with me as I have never done this before...

So, Here is how it turned out with my daughter's doll as a model since her little brother hasn't made his entrance into the world yet.
Materials needed:
Size K Crochet Hook
1 Skien Baby Clouds Yarn (or other bulky soft yarn. )
A small amount of contrasting yarn for the trim around the hood.
Yarn Needle
Ok, here goes nothing!
With the bulky yarn:
Ch 4; join with a sl st to the first ch to form a ring.
Rnd 1: Ch 2 (Counts as first HDC here and throughout.) Work 11 more HDC in the ring. Join with a sl st to Ch 2.
Rnd 2,3,4: Ch 2, 2 HDC in next st, [HDC in next st, 2 HDC in next st] continue around and join with a sl st to Ch 2.
From here, I just did a Ch 2 and HDC in each st around then joined to Ch 2 with a sl st.
I also alternated between HDC and DC each row for some reason, I don't know why... :)
Note: As I was working this, I realized I probably could have done the bottom different, because as I was working it, It kind of had a flattened bowl shape, which isn't really as tapered as I was going for, but it seems to be fine once it's filled. :)
Once it measured about 10" laying flat..
Then I decided I should start working on the hood. From here, it gets kinda tricky, and I am very open to any suggestions anyone has!
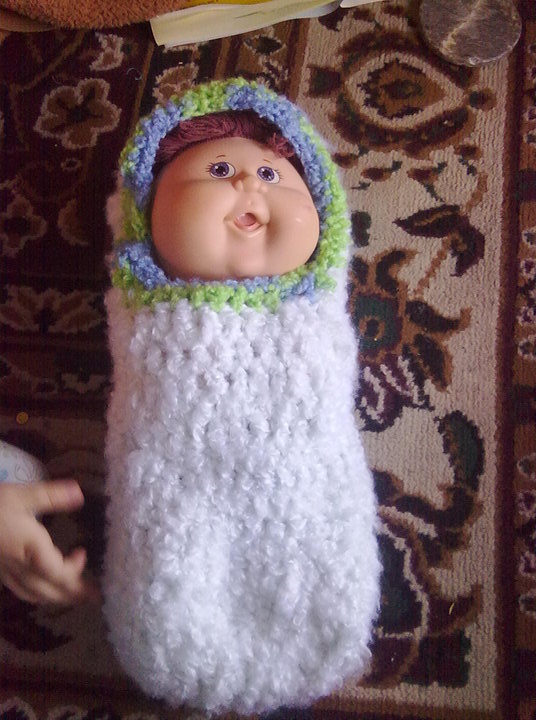
So, Here is how it turned out with my daughter's doll as a model since her little brother hasn't made his entrance into the world yet.
Materials needed:
Size K Crochet Hook
1 Skien Baby Clouds Yarn (or other bulky soft yarn. )
A small amount of contrasting yarn for the trim around the hood.
Yarn Needle
Ok, here goes nothing!
With the bulky yarn:
Ch 4; join with a sl st to the first ch to form a ring.
Rnd 1: Ch 2 (Counts as first HDC here and throughout.) Work 11 more HDC in the ring. Join with a sl st to Ch 2.
Rnd 2,3,4: Ch 2, 2 HDC in next st, [HDC in next st, 2 HDC in next st] continue around and join with a sl st to Ch 2.
From here, I just did a Ch 2 and HDC in each st around then joined to Ch 2 with a sl st.
I also alternated between HDC and DC each row for some reason, I don't know why... :)
Note: As I was working this, I realized I probably could have done the bottom different, because as I was working it, It kind of had a flattened bowl shape, which isn't really as tapered as I was going for, but it seems to be fine once it's filled. :)
Once it measured about 10" laying flat..
 |
| This is what I mean by laying flat.. |
I decided about 5" was a good size for the opening, so I Ch 2, then DC across until I was 5" from my Ch 2.
Then I turned and Ch 2 and DC back around on the stitches I had just done to leave the 5" gap.
I did a few more rounds this way, then realized I needed to start shaping the hood. So I started decreasing 4 or 5 stitches spaced out around the rows. About this time I realized it wasn't going to work so I tried to come up with a different plan.
Now, from here on out, this may not make any sense. And I would love to hear a better way to finish this!
Anyway, I for some reason though tit's be a good idea to make a chain at one end of my built up section and measure it out to the other end as I though the hood should look. I then attached in to the other end, so there was a weird chain only attached at the ends of the hood area. Form here it gets worse.. Then I did a row of DC on the chain and realized I wasn't sure how I was going to attach it to the rest of the body, so I started making rounds again. All the way around the chain and the top of the hood part that was attached. I would Ch 2, then HDC in the next st, then Dc2tog in the next 2 st, And I repeated this pattern around and joined to the Ch 2 with a sl st. Once the opening was about 3" across or so, I held the pieces together and sl st through both sides to close the hole. Whew! I'm sure that all sounds like gibberish, and I'm sorry!!
Anyway, from there I wove in the ends. Then I joined my blue/green yarn to the inside edge of the opening and Ch 2 then HDC in each stitch around, joining to the Ch 2 with a sl st. Then, I Ch 3, and DC each st around and joined to Ch 3. Then finished it off and wove in the ends.
I really hope this helps someone, and also, if I get any tips or suggestions, I will be sure to update the pattern!! Maybe sometime soon it'll get fixed and be a bit more functional. :D
Thanks for reading!
My Curiosity....
Ok, so, I don't know if this will be something I'm able to keep up, but I kinda wanted to start a blog with a bunch of random craziness! I get these koo-koo ideas, and sometimes they turn out great. Other times, not so much, but I'd like to share the craziness that turns out good with others. Maybe it'll help someone figure out how to do or make something. And hopefully other people will see this and can tell me what they would do to make it better.
My first post will be about my first attempt at making a baby cocoon. I had no luck finding a crochet pattern online, so I decided to be brave and attempt one all on my own.
 I don't think it turned out bad, but it could use some work! Especially on how to make the hood. I don't even know if I could really explain how I did that!
Basically, I took a baby hat pattern, and changed the yarn type to the Baby Clouds, and used a much larger hook, a K I believe, and used the directions for the first few rounds to get the basic bottom shape. Once it was what I thought was big enough around, I just started working rounds alternating between DC and HDC every other round. Though in hindsight, looking at the picture that inspired me, I should have make the foot area much smaller and expended gradually up the body of the piece, but oh well. Anyway, that is basically how I did the body. And like I said, I need to come up with a better way to make the hood. Any suggestions would be super!! And, I f anyone really wanted to know, I could post more detailed instructions later. This whole thing is kind of a test. Anyway, hope you enjoyed! :D
My first post will be about my first attempt at making a baby cocoon. I had no luck finding a crochet pattern online, so I decided to be brave and attempt one all on my own.

Basically, I took a baby hat pattern, and changed the yarn type to the Baby Clouds, and used a much larger hook, a K I believe, and used the directions for the first few rounds to get the basic bottom shape. Once it was what I thought was big enough around, I just started working rounds alternating between DC and HDC every other round. Though in hindsight, looking at the picture that inspired me, I should have make the foot area much smaller and expended gradually up the body of the piece, but oh well. Anyway, that is basically how I did the body. And like I said, I need to come up with a better way to make the hood. Any suggestions would be super!! And, I f anyone really wanted to know, I could post more detailed instructions later. This whole thing is kind of a test. Anyway, hope you enjoyed! :D
Subscribe to:
Posts (Atom)